
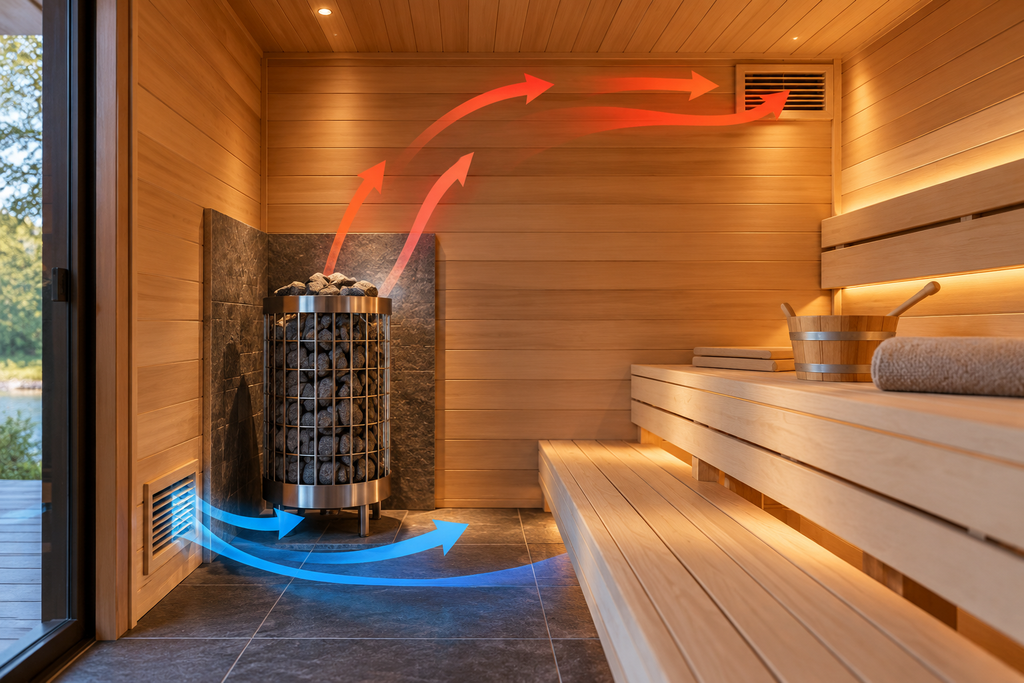
Sauna ventilation is easy to underestimate because a sauna is supposed to be hot. But a well-designed sauna still needs fresh air, a path for used air to leave, and a way to dry the room after bathing. The goal is not to cool the sauna. It is to keep the air comfortable, help heat move through the room, manage moisture and let the sauna dry between sessions.
The tricky part is that there is no single intake-and-exhaust layout that is correct for every sauna. Vent placement changes with the heater, whether the room uses mechanical or gravity ventilation, and sometimes the location of the heater’s temperature sensor. Harvia and HUUM, for example, both publish different layouts for mechanical and gravity systems. That is why the exact heater installation manual should always override a generic diagram or rule of thumb.
This guide explains the principles well enough to plan a home sauna intelligently, recognize common mistakes and have a more useful conversation with your sauna supplier, electrician or builder.
Quick Answer: How Does Sauna Ventilation Work?
A typical sauna ventilation plan has a fresh-air supply, an exhaust path and, in many designs, a separate high drying vent. Fresh air enters the sauna, mixes with the heated room air, moves through the occupied zone and leaves through the exhaust. After the session, the room is ventilated so moisture can escape.
Harvia and HUUM both use six air changes per hour as guidance in their current electric-heater ventilation instructions. That does not mean every DIY sauna should be designed from that number alone; vent size, duct resistance, fan capacity, heater location and the manufacturer’s required layout still matter.
| Part | What it does | Typical planning question |
|---|---|---|
| Supply / intake | Brings fresh air into the sauna | Where should fresh air enter for this heater and ventilation type? |
| Exhaust | Removes used air and helps establish airflow through the occupied zone | Where should air leave, and is the exhaust passive or fan-assisted? |
| Drying vent | Helps remove residual heat and moisture after bathing | Does the heater manual call for a separate high vent, or should the door be opened after use? |
| Door undercut / transfer path | Can provide a route to an exhaust located outside the sauna | Does the specified system require a gap below the sauna door? |
Why Sauna Ventilation Matters
Good ventilation is about more than getting oxygen into a small room. Airflow affects how evenly the sauna feels, how quickly stale air is removed and how effectively moisture can leave after bathing. Saunum also emphasizes air mixing because hot air naturally collects near the ceiling while cooler air settles lower in the room.
Poorly planned airflow can contribute to a sauna that feels stuffy, has a large temperature difference between head and feet, or stays damp longer than it should after use. But more ventilation is not automatically better. An intake aimed at a temperature sensor can cool the sensor and interfere with heater control, while excessive cold air in the wrong location can make the room harder to heat.
Think of ventilation as part of the sauna system rather than an accessory added after the benches and heater are installed.
The Most Important Distinction: Mechanical vs. Gravity Ventilation
Before deciding where to cut a vent, determine whether the sauna will use mechanical ventilation or gravity ventilation. The same vent locations should not be copied blindly between the two.
Mechanical ventilation
Mechanical ventilation uses a fan or the building’s ventilation system to move air. Harvia’s current electric-sauna guidance places the supply in the upper part of the sauna for a mechanically ventilated room and warns that the incoming air must not interfere with the heater’s temperature sensor. HUUM’s DROP manual similarly places the mechanical supply at the middle of the heater or higher, with the exhaust low on the opposite side.
The advantage of mechanical ventilation is control. A properly designed exhaust can pull fresh air through the room and occupied bench area instead of relying only on temperature and pressure differences.
Gravity ventilation
Gravity, or natural, ventilation relies on passive air movement rather than a powered exhaust. Harvia’s electric-heater guidance places the supply below or next to the heater and the exhaust near the floor as far from the heater as possible. HUUM’s gravity layout also places the supply at the middle of the heater or lower, but specifies the exhaust on the opposite wall at least 7 7/8 inches (200 mm) higher than the supply while remaining no more than 23 5/8 inches (600 mm) from the floor.
Those differences are exactly why a generic statement such as ‘put the intake low and exhaust high’ is not enough for a modern home sauna.
Where Should the Sauna Air Intake Go?
The correct intake location depends first on the heater manufacturer’s ventilation diagram.
For Harvia electric heaters, the company’s general guidance puts the mechanical supply in the upper part of the sauna. With gravity ventilation, Harvia places the supply below or next to the heater and gives a 50–100 mm (about 2–4 inch) supply-vent diameter range.
HUUM’s DROP U.S. manual specifies a 50–100 mm (about 2–4 inch) supply pipe as well. For mechanical ventilation it places the supply at the middle of the heater or higher — at least 15 3/4 inches (400 mm) high. For gravity ventilation it places the supply at the middle of the heater or lower — no more than 15 3/4 inches (400 mm) high.
Do not treat those dimensions as interchangeable instructions for every brand. Use them to understand the design logic, then follow the manual for the exact heater you install.
Where Should the Exhaust Vent Go?
The exhaust should create a useful airflow path through the sauna rather than allowing fresh air to enter and immediately escape.
With an electric heater and mechanical ventilation, both Harvia and HUUM describe a low exhaust away from or opposite the heater. HUUM specifies an exhaust no more than 23 5/8 inches (600 mm) from the floor. Harvia says that for gravity ventilation the exhaust should be near the floor and as far from the heater as possible, with the exhaust pipe diameter twice the supply-pipe diameter.
HUUM likewise specifies an exhaust pipe twice the supply diameter: approximately 100–200 mm (about 4–8 inches) when its 50–100 mm supply range is used.
A low exhaust may look counterintuitive if you have seen simple diagrams with a vent near the ceiling. The reason is that the operating exhaust and the drying vent can serve different jobs. Some systems deliberately pull operating air low through the occupied zone, while a separate high opening is reserved for drying after the sauna is turned off.
Do You Need a High Vent Near the Ceiling?
Often, but its purpose matters.
HUUM’s current U.S. heater manuals describe a drying-pipe opening on the wall opposite the heater under the ceiling. HUUM says to keep that drying opening closed while using the sauna and use it for final ventilation after the session, or when excess humidity or poor air quality calls for additional ventilation.
Harvia also describes an optional drying vent that remains closed during heating and bathing, and notes that the sauna can instead be dried by leaving the door open after bathing.
Finlandia uses a somewhat different traditional room approach: it recommends a lower intake near the heater and an upper outlet, and notes that the upper vent can be closed during heating for faster warm-up. The important lesson is not that one manufacturer is right and another is wrong. It is that the vent system is designed as a complete layout. Follow the system intended for your heater and room.
How Much Ventilation Does a Sauna Need?
Harvia says the air in an electric sauna should change six times per hour. HUUM gives the same six-air-changes-per-hour target in its DROP U.S. manual. Finlandia describes four to six air changes per hour when both of its recommended vents are open.
Air changes per hour, usually abbreviated ACH, describes how many times an amount of air equal to the room’s volume is replaced in one hour. For example, a 350-cubic-foot sauna at six ACH corresponds to 2,100 cubic feet per hour, or about 35 cubic feet per minute, before accounting for real-world duct losses and system design.
That arithmetic is useful for understanding scale, but it is not a fan-sizing prescription. Duct length, bends, grille restriction, pressure, building HVAC balance and the heater manufacturer’s required layout can all change what is appropriate. If the sauna uses a powered exhaust, size and balance the system as part of the room design rather than buying a fan from the simple ACH calculation alone.
Sauna Ventilation and the Temperature Sensor
This is one of the easiest details to get wrong.
Many electric sauna heaters use a wall-mounted or separate temperature sensor. Harvia specifically warns not to place the supply so incoming air cools the temperature sensor. If the manufacturer’s minimum distance between the supply vent and sensor cannot be met, Harvia says the ventilation arrangement must be altered.
A sensor exposed to a stream of cooler supply air may not measure the room the way the control system expects. That can affect heater operation. Before cutting the intake opening, locate the heater, locate the required sensor position, then check the ventilation diagram in the same manual.
Can the Sauna Exhaust Into an Adjacent Room?
Sometimes. It depends on the sauna design and the building ventilation strategy.
Harvia notes that if the exhaust is in the washroom, the gap under the sauna door must be at least 100 mm (about 4 inches) and mechanical exhaust ventilation is mandatory in that arrangement. HUUM likewise specifies at least a 100 mm door gap when the exhaust is located in the washroom.
Finlandia says its indoor sauna rooms usually vent to indoor air and generally do not require ductwork for its typical vent arrangement. These examples show why ‘does a sauna have to vent outdoors?’ does not have one universal answer.
For a sauna inside a house, think beyond the sauna walls. Moisture discharged from the sauna still has to be handled by the surrounding bathroom, changing room or building HVAC system. Local building requirements and the room’s moisture-management design still apply.
What Changes With a Wood-Burning Sauna?
A wood-burning heater adds combustion to the ventilation problem, so do not simply copy an electric-sauna layout.
Harvia’s guidance for a wood-burning sauna differs from its electric-heater guidance. For gravity ventilation, Harvia places the fresh-air inlet close to the floor near the stove and the outlet far from the stove near the roof. For mechanical ventilation, Harvia places the fresh-air inlet roughly 500 mm (about 20 inches) above the stove and the outlet low, such as under the benches.
A wood stove also needs the combustion air, clearances, chimney and installation conditions specified by the stove manufacturer and applicable local requirements. The ventilation openings described for sauna comfort should not be assumed to replace any required combustion-air provision.
What About Saunum Air-Mixing Systems?
Saunum systems intentionally circulate and mix sauna air, so their ventilation diagrams deserve special attention. The current Saunum Air L U.S. manual provides separate diagrams for mechanical and natural ventilation and shows the air intake and extraction positions in relation to the climate device.
If you are installing a Saunum climate device or heater, use the Saunum manual for that product rather than applying a conventional heater diagram. The entire point of the system is to change how air and heat move through the sauna.
Common Sauna Ventilation Mistakes
- Copying a vent diagram from a different heater brand or model.
- Using the same vent locations for mechanical and gravity ventilation.
- Putting the supply where incoming air can cool the heater’s temperature sensor.
- Treating a high drying vent as if it must remain open during every sauna session.
- Assuming a bigger fan or larger vent automatically improves the sauna.
- Forgetting that moisture exhausted into an adjacent room still has to leave the building.
- Copying an electric-sauna layout for a wood-burning stove.
- Cutting vents before the heater, sensor, benches and exhaust route have been finalized.
A Practical Ventilation Planning Sequence
- Choose the exact heater or sauna system first. Ventilation is difficult to finalize intelligently before you know the heater.
- Read that model’s installation manual. Find its ventilation diagram, temperature-sensor location and any required clearances.
- Decide whether the room will use mechanical or gravity ventilation. Do not mix the two layouts casually.
- Mark the heater, sensor and benches before marking vent openings. Make sure supply air will not interfere with the sensor.
- Plan the exhaust route. If it exhausts to a bathroom or adjacent room, confirm how that room will remove moisture.
- Plan post-session drying. Follow the manufacturer’s drying-vent instructions or approved door-opening procedure.
- Coordinate electrical, ventilation and wall penetrations before closing the walls. Our sauna electrical requirements guide covers the electrical side separately.
- Verify the final design against the heater manual and applicable local requirements before installation.
Sauna Ventilation Example: Why the Heater Manual Wins
Imagine two otherwise similar indoor electric saunas. One uses mechanical exhaust ventilation; the other relies on gravity ventilation. It would be tempting to give both rooms the same intake next to the heater and an outlet high on the opposite wall.
But Harvia’s current guidance changes the electric-sauna supply location depending on whether ventilation is mechanical or gravity based. HUUM does the same. A vent layout that looks reasonable in a generic drawing can therefore be wrong for the actual system.
This is why Sauna Handbook recommends planning ventilation only after you have selected the heater. If you are still choosing equipment, use our sauna heater size calculator and Best Sauna Heaters guide first, then return to the exact installation manual for the model you select.
Sauna Ventilation: The Bottom Line
A good sauna needs controlled airflow, but the right solution is not simply ‘one vent low and one vent high.’ Modern electric saunas may use different intake positions for mechanical and gravity ventilation, low operating exhausts, separate drying vents and strict spacing around temperature sensors.
Start with three questions: Which heater are you installing? Is the ventilation mechanical or gravity based? Where does the manufacturer require the supply, exhaust and sensor? Once those are answered, vent sizing and routing become much easier to plan.
For the rest of the room design, continue with our sauna size guide, sauna heater size calculator and sauna electrical requirements guide. If you are building outdoors, our outdoor sauna guide covers the additional weather and site-planning considerations.
Frequently Asked Questions
Does a sauna need ventilation?
Yes, a properly planned sauna needs a way to bring in fresh air, move used air out and dry the room after bathing. The exact vent arrangement depends on the heater and whether the system uses mechanical or gravity ventilation.
How many air changes per hour should a sauna have?
Harvia and HUUM currently specify six air changes per hour in their electric-sauna ventilation guidance. Finlandia describes four to six air changes per hour for its typical room vent arrangement. Treat those as manufacturer guidance, not a substitute for the manual for your exact heater and ventilation system.
Should a sauna intake vent be above or below the heater?
It depends. Harvia places the supply in the upper part of an electrically heated sauna with mechanical ventilation, but below or next to the heater with gravity ventilation. HUUM also changes supply height depending on ventilation type. Follow the exact heater manual.
Should the sauna exhaust vent be high or low?
It depends on the ventilation design. Several current electric-heater layouts use a low operating exhaust and a separate high opening for drying. Other sauna-room systems use an upper outlet. Do not choose the exhaust location independently of the complete ventilation layout.
Should the drying vent stay open while the sauna is running?
Not necessarily. HUUM instructs users to keep its high drying opening closed while taking a sauna, and Harvia describes an optional drying vent that is closed during heating and bathing. Follow the instructions for your system.
Does a sauna have to vent outside?
Not always. Some indoor sauna systems can transfer air to an adjacent room, provided the surrounding ventilation and moisture-management plan supports it. Manufacturer requirements and local building conditions should determine the final route.
Can I use a bathroom exhaust fan for sauna ventilation?
Potentially, if the complete mechanical ventilation design, airflow and heater manufacturer’s instructions support that arrangement. Do not assume an existing bathroom fan has the correct capacity or creates the correct airflow path through the sauna.